

Doll Maintenance: Replacing Leather
Oct 28, 2014 15:28:41 GMT -8
Post by allurose on Oct 28, 2014 15:28:41 GMT -8
I replaced the leather on some of my Paperwhite Doll's joints yesterday. Teri, the artist, would have been happy to do it for me, but I am very selfish and didn't want to send my beautiful girl away! So I asked Teri to send me some leather instead. The replacement went really well, so I've made up a little tutorial!
I think many dolls need leather replacement eventually, especially if it is fine thin leather like the Paperwhite Dolls have. Often artists include leather replacement in a lifetime warranty for the doll, but not all artists do this and sometimes shipping the doll back to the artist isn't practical.
There are probably lots of people who have more experience with this than me, so I welcome your comments and suggestions!
Materials:

leather supplied by Teri by TinyJewelsShop, on Flickr
-leather, the same thickness as the doll originally had since that will fit the joints best
-a thick towel, beading mat, or other cushy surface to work on
-strong straight pins
-tweezers
-curved dental/sculpting tool or tiny crochet hook
-sharp embroidery scissors or xacto knife
-toothpicks
-glue (I used white craft glue, but there may be a better option)
-another person to help you disassemble gently
Steps:
1. Always work over a soft surface. It's easy to drop parts of the doll as it comes apart, and you don't want anything to shatter or chip.
2. Gently pull open the doll's joint at the wrist or ankle. Try not to overextend the springs, but gently disassembling once in a while won't significant'y reduce the life of the spring. You will see a hook that attaches to springs or elastic inside the arm. Unhook it, and be prepared for pieces to fall. You may need to use the tweezers to grasp the hook. This is where a third person is helpful. One person pulls apart the wrist and hand, and one person does the unhooking. It is possible to do this alone by pulling the joints apart one handed or by using your knees as a third "hand," but I don't recommend this if it's your first time restringing a doll.
3. Depending how the doll's tension is created, you may have to repeat this process for each joint, or the whole limb (or two limbs) may disconnect at once. Disassemble as much as necessary depending on the leather you want to replace. For my Paperwhite Doll, I only needed to replace the leather on one arm, so I used a straight pin to hold the spring in her torso. For your doll there may be many pieces of elastic, one piece of elastic, springs and swivels, or even strong string holding the doll together. Whatever is in there, just make note of how it was put together for later. You can draw it on paper or take a photo. If you are taking apart more than one limb, make sure you know which is which! And notice which way the elbows and knees go, etc. Since it's porcelain, you can even write on the pieces themselves so you can keep track (the pencil can wash off easily).
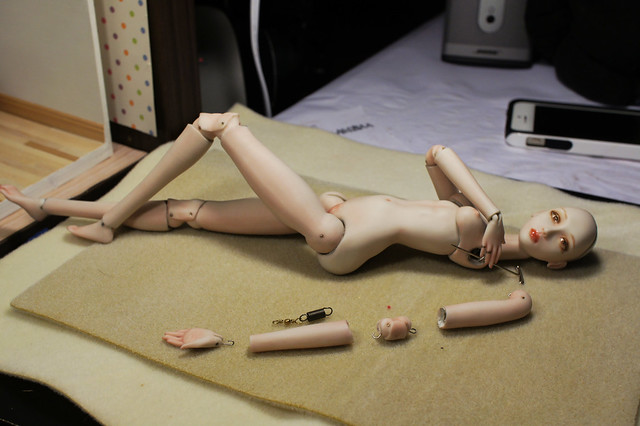
Replacing Leather by TinyJewelsShop, on Flickr
You can see here the brass swivel and the steel spring for her lower arm. The spring for her upper arm is still inside the arm.
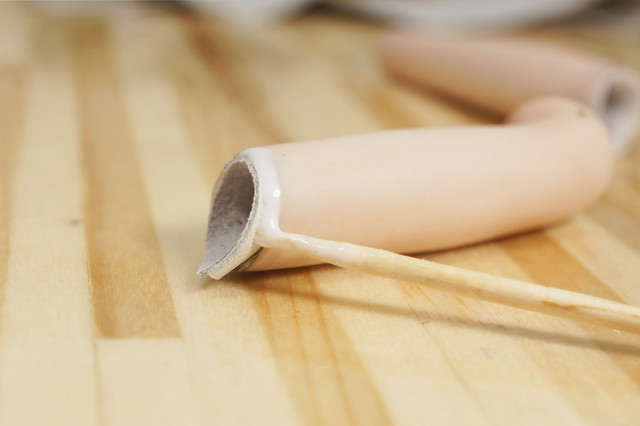
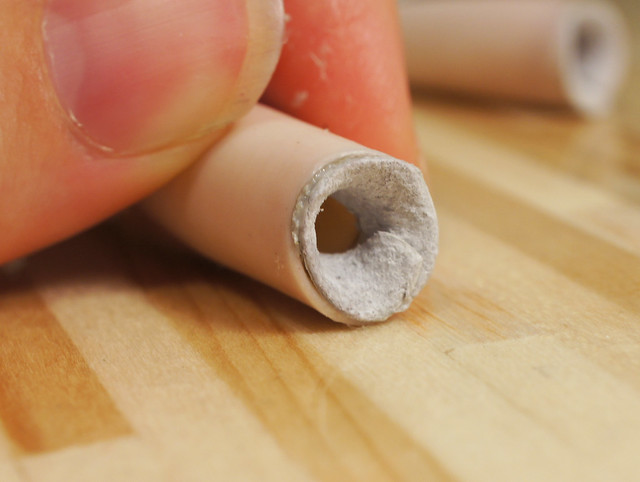
4. Examine the joints and clean out old leather if necessary. The leather might be completely gone like in the wrist here, or it might just be worn down like in the elbow joints in my photos. I used tweezers to pull out the rest of the leather. Soaking it may also help.
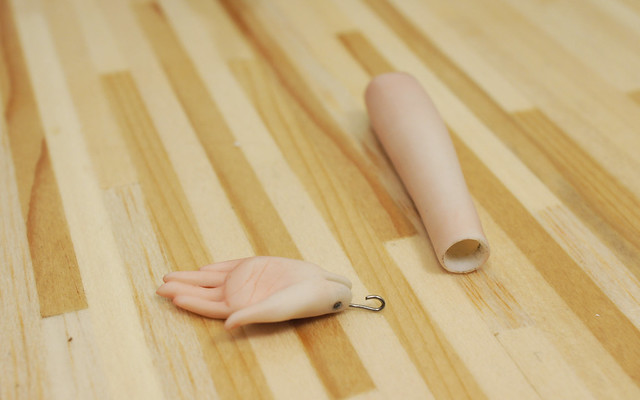
Before (leather fell out) by TinyJewelsShop, on Flickr
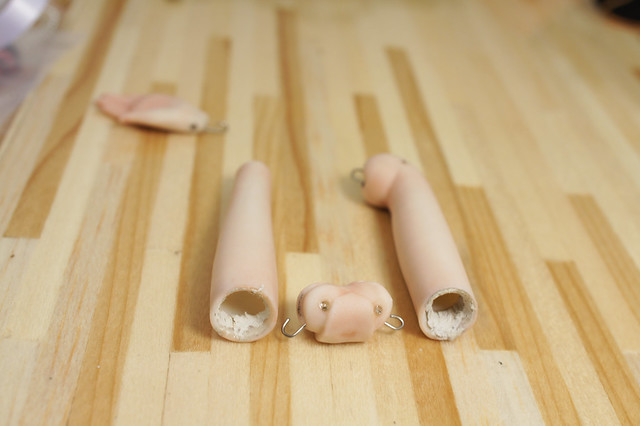
Before (leather worn down) by TinyJewelsShop, on Flickr
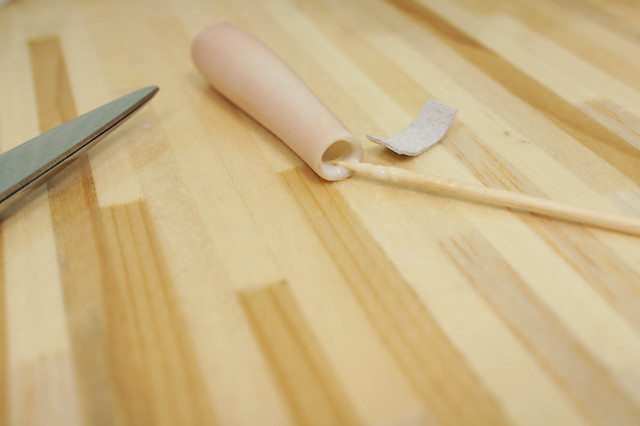
5. Cut little pieces of leather about the right size to go in the joint. Usually you will need little rectangles or crescents, but some joints like hips may need a different shape. If the concave "socket" of the joint that wraps around the ball of the next piece is small, the leather may need to extend into the tube of the limb. For example, in the wrist, there isn't much surface area for glueing at the end, so I made the pieces big enough to wrap into her arm as well. Try to figure out the way it was originally and copy that. You can hold them in the joint to estimate the size and shape, but it doesn't have to be perfect. Too big is better than too small.
6. Use a toothpick to spread glue on the inside of the joint. Spread it inside the tube of the limb as well. Don't worry if it squeezes out more than you intended.
Spread glue with toothpick by TinyJewelsShop, on Flickr
7. Insert the leather and use the toothpick to press it into the glue and against the inside of the limb. You can see here that I didn't have the leather exactly the right shape. That's fine, I will trim it later.

Fit leather into joint, press with toothpick by TinyJewelsShop, on Flickr
8. Apply more glue around the edges as necessary, and wrap the leather around to fit.
More glue by TinyJewelsShop, on Flickr
9. Press the edges down flat into the glue, then wipe off the extra glue and trim to the shape of the joint using the craft blade or embroidery scissors.
Press down, trim leather by TinyJewelsShop, on Flickr
10. Wait for the glue to try completely. I left mine overnight.
11. Restring your doll, following the reverse of whatever you did to disassemble it. This is why it's really important to make good notes and photos during disassembly! I didn't pay attention to which way her elbow went, and I had to figure it out the hard way.
To pull the springs or elastic through the joints, you may have to get creative. You can use strong string (not thin thread like in the photo, that broke under the tension), yarn, or something like that. What worked really well for me was this metal dental/sculpting tool with a hook on the end (see photo). A very fine crochet hook like for making lace would probably be really good to work with. Just like with disassembly, you will probably want a second person. It's really a three handed job unless you have lots of experience and confidence.
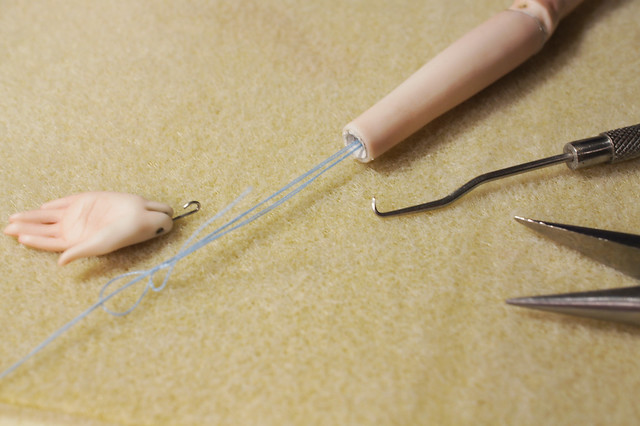
Dental hook or crochet hook to redo springs by TinyJewelsShop, on Flickr
And here is a photo of my Alisha after I finished, to show you I really did it! No zombie-like misplaced limbs or anything

After (Right arm has new leather) by TinyJewelsShop, on Flickr
The arm on the left has the original leather. It didn't need to be replaced yet. The arm on the right has the leather I replaced. I think it looks pretty good, and she poses so much better now that she has her leather back. <3
I hope this was useful! Let me know if you have suggestions, or if you try it, let us know how it goes!
I think many dolls need leather replacement eventually, especially if it is fine thin leather like the Paperwhite Dolls have. Often artists include leather replacement in a lifetime warranty for the doll, but not all artists do this and sometimes shipping the doll back to the artist isn't practical.
There are probably lots of people who have more experience with this than me, so I welcome your comments and suggestions!

Materials:
leather supplied by Teri by TinyJewelsShop, on Flickr
-leather, the same thickness as the doll originally had since that will fit the joints best
-a thick towel, beading mat, or other cushy surface to work on
-strong straight pins
-tweezers
-curved dental/sculpting tool or tiny crochet hook
-sharp embroidery scissors or xacto knife
-toothpicks
-glue (I used white craft glue, but there may be a better option)
-another person to help you disassemble gently
Steps:
1. Always work over a soft surface. It's easy to drop parts of the doll as it comes apart, and you don't want anything to shatter or chip.
2. Gently pull open the doll's joint at the wrist or ankle. Try not to overextend the springs, but gently disassembling once in a while won't significant'y reduce the life of the spring. You will see a hook that attaches to springs or elastic inside the arm. Unhook it, and be prepared for pieces to fall. You may need to use the tweezers to grasp the hook. This is where a third person is helpful. One person pulls apart the wrist and hand, and one person does the unhooking. It is possible to do this alone by pulling the joints apart one handed or by using your knees as a third "hand," but I don't recommend this if it's your first time restringing a doll.
3. Depending how the doll's tension is created, you may have to repeat this process for each joint, or the whole limb (or two limbs) may disconnect at once. Disassemble as much as necessary depending on the leather you want to replace. For my Paperwhite Doll, I only needed to replace the leather on one arm, so I used a straight pin to hold the spring in her torso. For your doll there may be many pieces of elastic, one piece of elastic, springs and swivels, or even strong string holding the doll together. Whatever is in there, just make note of how it was put together for later. You can draw it on paper or take a photo. If you are taking apart more than one limb, make sure you know which is which! And notice which way the elbows and knees go, etc. Since it's porcelain, you can even write on the pieces themselves so you can keep track (the pencil can wash off easily).
Replacing Leather by TinyJewelsShop, on Flickr
You can see here the brass swivel and the steel spring for her lower arm. The spring for her upper arm is still inside the arm.
4. Examine the joints and clean out old leather if necessary. The leather might be completely gone like in the wrist here, or it might just be worn down like in the elbow joints in my photos. I used tweezers to pull out the rest of the leather. Soaking it may also help.
Before (leather fell out) by TinyJewelsShop, on Flickr
Before (leather worn down) by TinyJewelsShop, on Flickr
5. Cut little pieces of leather about the right size to go in the joint. Usually you will need little rectangles or crescents, but some joints like hips may need a different shape. If the concave "socket" of the joint that wraps around the ball of the next piece is small, the leather may need to extend into the tube of the limb. For example, in the wrist, there isn't much surface area for glueing at the end, so I made the pieces big enough to wrap into her arm as well. Try to figure out the way it was originally and copy that. You can hold them in the joint to estimate the size and shape, but it doesn't have to be perfect. Too big is better than too small.
6. Use a toothpick to spread glue on the inside of the joint. Spread it inside the tube of the limb as well. Don't worry if it squeezes out more than you intended.
Spread glue with toothpick by TinyJewelsShop, on Flickr
7. Insert the leather and use the toothpick to press it into the glue and against the inside of the limb. You can see here that I didn't have the leather exactly the right shape. That's fine, I will trim it later.
Fit leather into joint, press with toothpick by TinyJewelsShop, on Flickr
8. Apply more glue around the edges as necessary, and wrap the leather around to fit.
More glue by TinyJewelsShop, on Flickr
9. Press the edges down flat into the glue, then wipe off the extra glue and trim to the shape of the joint using the craft blade or embroidery scissors.
Press down, trim leather by TinyJewelsShop, on Flickr
10. Wait for the glue to try completely. I left mine overnight.
11. Restring your doll, following the reverse of whatever you did to disassemble it. This is why it's really important to make good notes and photos during disassembly! I didn't pay attention to which way her elbow went, and I had to figure it out the hard way.
To pull the springs or elastic through the joints, you may have to get creative. You can use strong string (not thin thread like in the photo, that broke under the tension), yarn, or something like that. What worked really well for me was this metal dental/sculpting tool with a hook on the end (see photo). A very fine crochet hook like for making lace would probably be really good to work with. Just like with disassembly, you will probably want a second person. It's really a three handed job unless you have lots of experience and confidence.
Dental hook or crochet hook to redo springs by TinyJewelsShop, on Flickr
And here is a photo of my Alisha after I finished, to show you I really did it! No zombie-like misplaced limbs or anything

After (Right arm has new leather) by TinyJewelsShop, on Flickr
The arm on the left has the original leather. It didn't need to be replaced yet. The arm on the right has the leather I replaced. I think it looks pretty good, and she poses so much better now that she has her leather back. <3
I hope this was useful! Let me know if you have suggestions, or if you try it, let us know how it goes!


